 As I type this, the sun IS shining and has now melt the extra 3 inches of snow we woke up to this morning off the road and our driveway. My husband is watching hockey and the boys are outside in the mud, so I feel like I can take a moment to make this new post. I think God is trying to teach us here in Ponoka, AB to be content in all circumstances and to glorify him all the same. And that's what I'll do, praise God!
Sunday, April 17, 2011
Here we are in Ponoka, AB in April and here is a picture of my apple orchardfrom yesterday. One row of trees is under water. It's so funny, because I look at pictures on other peoples blogs and they have pictures of beautiful apple blossoms, with green lush grass in the background, (which I can almost smell in my mind) and the sun is shining wonderfully. Then I look at my little trees, which lost all their blossoms last year due to frost and I pray that God will allow them to grow and produce wonderful, yummy fruit.  As I type this, the sun IS shining and has now melt the extra 3 inches of snow we woke up to this morning off the road and our driveway. My husband is watching hockey and the boys are outside in the mud, so I feel like I can take a moment to make this new post. I think God is trying to teach us here in Ponoka, AB to be content in all circumstances and to glorify him all the same. And that's what I'll do, praise God!
 As I type this, the sun IS shining and has now melt the extra 3 inches of snow we woke up to this morning off the road and our driveway. My husband is watching hockey and the boys are outside in the mud, so I feel like I can take a moment to make this new post. I think God is trying to teach us here in Ponoka, AB to be content in all circumstances and to glorify him all the same. And that's what I'll do, praise God!
Striped T-shirt skirt Part 1
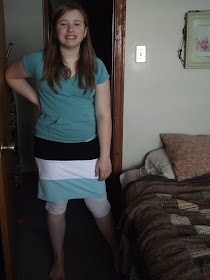
Rebekah did the neatest little project the other day that we got from a website. Here is a link to this craft; kids-sewing-projects.com/t-shirt-skirt. It only took us about 4 hours and it turned out pretty cool. Here are the instructions on how we did it. First we cut 7" bands of t-shirt. To get the t-shirts, we just went to the thrift store for bag sale and got tons for $5.00! So, we cut strips of all the colours we wanted in the skirt. Becky wanted to make it 4 stripes long.
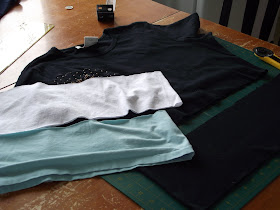
 So here is her colour scheme. Light blue, white and black. We cut all the bottom hems off the the bands, except for the strip we were placing on the bottom of the skirt. That way the skirt was already hemmed.
 First we cut 7" bands of t-shirt. To get the t-shirts, we just went to the thrift store for bag sale and got tons for $5.00! So, we cut strips of all the colours we wanted in the skirt. Becky wanted to make it 4 stripes long.
  So here is her colour scheme. Light blue, white and black. We cut all the bottom hems off the the bands, except for the strip we were placing on the bottom of the skirt. That way the skirt was already hemmed.
 Before we started sewing them together. We measured Becky's widest spot and sewed side seams on all the bands to be that width.
Please see Part 2 for the rest.
Striped T-shirt skirt Part 2
This how we were going to sew the bands together. Rebekah is sewing the first 2 bands together. We over-lapped them with right sides together, making sure we sewed on the opposite side of the hem. Also, we had to make sure we lined up the side seams. (After we had finished this project, I thought it might have been easier to make the bands1" too big, then when we were done, just sew 1/2" seams on both sides. That way it would be a very neat seam along the side.)
 Rebekah is sewing the first 2 bands together. We over-lapped them with right sides together, making sure we sewed on the opposite side of the hem. Also, we had to make sure we lined up the side seams. (After we had finished this project, I thought it might have been easier to make the bands1" too big, then when we were done, just sew 1/2" seams on both sides. That way it would be a very neat seam along the side.)


