I am under my annual crunch time to make crafts for a craft show I go in. It is this Saturday. I have managed to make 18 of these amazing, sweet nativity ornaments so far.
They were so easy to make, The hard part was finding this type of clothes pin. I actually found them at a locally owned little dollar store. Although, I did find them for the same price in packs of 100 on Amazon.
I had to cut the bottom part off 1/3 of them to be baby Jesus. I glued 2 together, one just a little higher than the other for Mary and Joseph. I tied a raffia bow on all the baby Jesus', then glued Him on an angle across the front.
These rusty stars were from Ebay. I twisted rusty wire trough the star, then glued it to the back of the ornament. You can see it in the picture below. The twine hanger is also glued in the back. I used Goop glue for the gluing because I find it is so strong and won't fall apart.
They turned out so adorable!
God bless you and thank you for stopping by.
Showing posts with label Crafts. Show all posts
Monday, October 31, 2016
Wednesday, October 19, 2016
Crocheted Pumpkins
I found this pattern on Pinterest for these cute crocheted pumpkins. They are so quick to make and fun.
I added some embellishments, such as, little keys, tags that say fall, old little curly-cue bed springs. And I glued some of the bigger ones onto a bed spring with a doily under it.
I made them in 4 sizes. The smallest only takes about 1/2 hour to make. It was fun using different colours of yarn and it was a great way to use up yarn scraps.
You can find the pattern here.
Thanks for stopping by.
This post is linked up to :
Talk of The Town
Vintage Charm Adirondack Girl
Make it Pretty Monday
Dagmar's Home Link Party
Thursday, March 17, 2016
Twine and Lace Eggs
I have made a few sets of these spring eggs this past week and I really like the way they turned out.
I used the cheap plastic Easter eggs to make them. Before I wrapped them in twine, I glued the eggs shut and spray painted them brown in case of little gaps in the twine. I'd hate to see bright pink shining through.
When they were ready, I started out the twine by gluing the beginning of the twine to the top of the egg. I let it dry so that the twine was secured. Then I was able to start wrapping the twine around the egg, gluing as I went.
Once it was wrapped, I added the embellishments, such as lace, buttons, raffia and lace flowers. I always find a way to use a brown paper tag. I think they are so cute on things. For these eggs, I stamped the word "JOY" on them.
Here they are ready for market.
Thanks for stopping by,
Crystal
This post is linked up to:
Frugal Mommas Friday Linkup
Share it One More Time Inspiration Party
Vintage Charm
Welcome Home Wednesdays
I used the cheap plastic Easter eggs to make them. Before I wrapped them in twine, I glued the eggs shut and spray painted them brown in case of little gaps in the twine. I'd hate to see bright pink shining through.
When they were ready, I started out the twine by gluing the beginning of the twine to the top of the egg. I let it dry so that the twine was secured. Then I was able to start wrapping the twine around the egg, gluing as I went.
Once it was wrapped, I added the embellishments, such as lace, buttons, raffia and lace flowers. I always find a way to use a brown paper tag. I think they are so cute on things. For these eggs, I stamped the word "JOY" on them.
Here they are ready for market.
Thanks for stopping by,
Crystal
This post is linked up to:
Frugal Mommas Friday Linkup
Share it One More Time Inspiration Party
Vintage Charm
Welcome Home Wednesdays
Friday, March 4, 2016
DIY Jar Soap Dispenser
These jar soap dispensers are quite quick and easy to make.
For the pumps, I bought liquid soap on clearance and from the dollar store. I washed the pumps and cut them to size. Then I glued them in place with this glue called Goop.
Now, I just put it all together and tied some twine around the top and Voila!
But those aren't the best ones I made. Take a look at the one I made myself last summer. I hadn't painted it and couldn't see the image on the jar. The only reason I made this one for myself was the image. I have never seen another jar like this one.
Here it is after I painted it with olive green chalk paint.
I love, love, love it! And I wish I could find more jars like this.
Thanks for stopping by,
Crystal
This post is linked up to;
Anything Blue Friday
The Everyday Home
Vintage Charm Party
Amaze Me Monday
Sunday Showcase Linkup
Tweak it Tuesday
Show and Share
Something to Talk About
Welcome Home Wednesdays
Winter Blues Wednesday
Talk of The Town
Wake up Wednesday
I made some last year with the blue and green coloured glass jars, but this time I painted the jars with chalk paint. I found some paint at our local dollar store. I will probably try to use a Micheal's 40% off coupon to get a can of spray chalk paint. I found painting on glass with a paint brush hard to smooth the brush strokes. I also had to paint about 5 coats to get the coverage I wanted. I also painted both parts of the lid with off white chalk paint.
Once the paint was dry I took some coarse sand paper and distressed it. Then I sprayed it with matte clear sealing spray with 2 coats.
When I made the soap dispensers in summer, I just kind of punched a hole in the lid with a screw bit and screws and bent back the rough metal edges underneath the best I could. It looked pretty sloppy. This time my husband happened to be watching me and said he could do a better job. I had no doubt about that! He put the snap lid onto the jar with the screw band and screwed a hole with the biggest bit he had.
![]() |
| You can tell the lids I pucnhed the hole in and the lids Larry drilled the holes nicely. |
It was a bit too small, so then he used sand stone round bit and just used it until it was the right size. He also used this bit to sand the rough edges off the underside.
Now, I just put it all together and tied some twine around the top and Voila!
But those aren't the best ones I made. Take a look at the one I made myself last summer. I hadn't painted it and couldn't see the image on the jar. The only reason I made this one for myself was the image. I have never seen another jar like this one.
![]() |
| I had to use up some extra soap. That is why there is two colours. |
Here it is after I painted it with olive green chalk paint.
I love, love, love it! And I wish I could find more jars like this.
Thanks for stopping by,
Crystal
This post is linked up to;
Anything Blue Friday
The Everyday Home
Vintage Charm Party
Amaze Me Monday
Sunday Showcase Linkup
Tweak it Tuesday
Show and Share
Something to Talk About
Welcome Home Wednesdays
Winter Blues Wednesday
Talk of The Town
Wake up Wednesday
Monday, February 29, 2016
Easy Crocheted Baby Booties
(Scroll down for pattern)
So, I have been having fun crocheting these baby booties lately. I was using this Red Heart pattern. But, I didn't like how big the toes were.
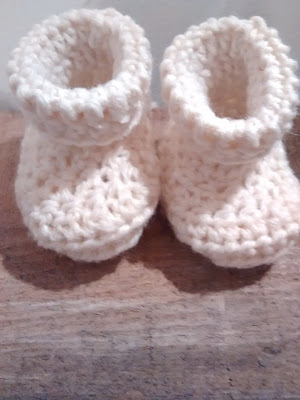
On the rows that make the toes, the pattern has half double crochet stitches along the side, then double crochet on the round part. I thought it might look better if I just used the half double crochet stitch along the whole row.
I know it's hard to see the difference, but the revised booties are more fitted. I also extended the top part 2 rows, because I think that's cuter.
Here is the revised pattern;
hdc2tog = Yarn over, insert hook into st and draw up a loop, yarn over and pull through 2 loops, yarn over, insert hook into next st and draw up a loop, yarn over and pull through all 4 loops.
Ch 9.
Round 1: Work 2 dc in 3rd ch from hook, dc in next 5 ch, 6 dc in last ch, turn to work along opposite side of beginning ch, dc in next 5 ch, 3 dc in last ch, slip st in top
of beginning ch to join. - 22 sts
Round 2: Ch 2, hdc in same st as slip st, 2 hdc in each of next 2 dc, hdc in next 5 dc, 2 hdc in each of next 6 dc, hdc in next 5 dc, 2 hdc in each of next 3 dc, slip st in top of
beginning ch to join. - 34 sts
Round 3: Ch 2, hdc through back loop in each st around, slip st to top of beginning ch to join. - 34 sts
Round 4: Ch 2, hdc in next 8 sts, [hdc2tog] 8 times, hdc in next 9 sts, slip st to top of beginning ch to join. - 26 sts
Round 5: Ch 2, hdc in next 8 sts, [hdc2tog] 4 times, hdc in next 9 sts, slip st to top of beginning ch to join. - 22 sts
Round 6: Ch 2, hdc in next 8 sts, [hdc2tog] 2 times, hdc in next 9 sts, slip st to top of beginning ch to join. - 20 sts
Round 7: Ch 2, dc in each st around, slip st to top of beginning ch to join. - 20 sts
Round 8: Ch 2, hdc in each st around, slip st to top of beginning ch to join. - 20 sts
Round 9: Ch 1, sc in each st around, slip st to top of beginning ch to join. - 20 sts
Round 10: Ch 2, dc in each st around, slip st to top of beginning ch to join. - 20 sts
Fasten off.
Thanks for stopping by,
Crystal
This post is linked up to; Monday of Many Blessings Link Up Happy and Blessed Home
Frugal Momma's Friday Linkup Sunday Showcase Linkup Something to Talk About
So, I have been having fun crocheting these baby booties lately. I was using this Red Heart pattern. But, I didn't like how big the toes were.
![]() |
| The original pattern. |
On the rows that make the toes, the pattern has half double crochet stitches along the side, then double crochet on the round part. I thought it might look better if I just used the half double crochet stitch along the whole row.
![]() |
| The revised pattern |
I know it's hard to see the difference, but the revised booties are more fitted. I also extended the top part 2 rows, because I think that's cuter.
Here is the revised pattern;
hdc2tog = Yarn over, insert hook into st and draw up a loop, yarn over and pull through 2 loops, yarn over, insert hook into next st and draw up a loop, yarn over and pull through all 4 loops.
Ch 9.
Round 1: Work 2 dc in 3rd ch from hook, dc in next 5 ch, 6 dc in last ch, turn to work along opposite side of beginning ch, dc in next 5 ch, 3 dc in last ch, slip st in top
of beginning ch to join. - 22 sts
Round 2: Ch 2, hdc in same st as slip st, 2 hdc in each of next 2 dc, hdc in next 5 dc, 2 hdc in each of next 6 dc, hdc in next 5 dc, 2 hdc in each of next 3 dc, slip st in top of
beginning ch to join. - 34 sts
Round 3: Ch 2, hdc through back loop in each st around, slip st to top of beginning ch to join. - 34 sts
![]() |
| Crocheting in the back loop |
Round 4: Ch 2, hdc in next 8 sts, [hdc2tog] 8 times, hdc in next 9 sts, slip st to top of beginning ch to join. - 26 sts
Round 5: Ch 2, hdc in next 8 sts, [hdc2tog] 4 times, hdc in next 9 sts, slip st to top of beginning ch to join. - 22 sts
Round 6: Ch 2, hdc in next 8 sts, [hdc2tog] 2 times, hdc in next 9 sts, slip st to top of beginning ch to join. - 20 sts
Round 7: Ch 2, dc in each st around, slip st to top of beginning ch to join. - 20 sts
Round 8: Ch 2, hdc in each st around, slip st to top of beginning ch to join. - 20 sts
Round 9: Ch 1, sc in each st around, slip st to top of beginning ch to join. - 20 sts
Round 10: Ch 2, dc in each st around, slip st to top of beginning ch to join. - 20 sts
Round 11: Ch 2, hdc in each st around, slip st to top of beginning ch to join. - 20 sts
Fasten off.
Thanks for stopping by,
Crystal
This post is linked up to; Monday of Many Blessings Link Up Happy and Blessed Home
Frugal Momma's Friday Linkup Sunday Showcase Linkup Something to Talk About
Friday, February 26, 2016
Winter Projects
I love the slow part of winter. No gardens to be weeded, no summer activities we like to cram in while the weather is nice. Just the right time to do extra projects.
I have been working on a few. Maybe too many at one time, but here are some that I have completed (or mostly completed).
I just have a couple more stitches and a little back stitching left to do on this cross-stitch.
I taught myself some new crochet stitches to whip up these baby booties. Once you get the hang of it, they only take about 45 minutes to finish. You can find the pattern here.
In the summer I delay some projects for winter. Like Salsa and Jalapeno Peach Jelly. I freeze whole tomatoes and freezer bags of pre-measured diced zucchini for salsa. I actually made a batch just before Christmas.
And I froze all the peach peels and some pits from when I canned 25 lbs of peaches. So I boiled them up to make juice, which I explained in this post. I made 18 1/2 pints of Jalapeno Peach Jelly. This time I added some vinegar to it for a little tang.
I will sell most of these at Farmers' Markets this year, but my kids love it so I will keep a few jars for them.
Thanks for stopping by,
Crystal
This post is linked up to: Home To 4 Kiddos Talk of The Town DIY Sunday Showcase Vintage Charm Craft Frenzy Friday Monday of Every Blessings Link Up
I have been working on a few. Maybe too many at one time, but here are some that I have completed (or mostly completed).
I just have a couple more stitches and a little back stitching left to do on this cross-stitch.
I taught myself some new crochet stitches to whip up these baby booties. Once you get the hang of it, they only take about 45 minutes to finish. You can find the pattern here.
In the summer I delay some projects for winter. Like Salsa and Jalapeno Peach Jelly. I freeze whole tomatoes and freezer bags of pre-measured diced zucchini for salsa. I actually made a batch just before Christmas.
And I froze all the peach peels and some pits from when I canned 25 lbs of peaches. So I boiled them up to make juice, which I explained in this post. I made 18 1/2 pints of Jalapeno Peach Jelly. This time I added some vinegar to it for a little tang.
I will sell most of these at Farmers' Markets this year, but my kids love it so I will keep a few jars for them.
Thanks for stopping by,
Crystal
This post is linked up to: Home To 4 Kiddos Talk of The Town DIY Sunday Showcase Vintage Charm Craft Frenzy Friday Monday of Every Blessings Link Up
Saturday, February 13, 2016
Twine Heart With Flowers
This is one of my latest craft projects.
My inspiration came from these wire hearts I bought off Ebay years ago. I couldn't think of many things to make with them, they just sat there, bugging me, until now. With Valentines coming up, I thought it would be a good time to think of something to make.
I started the twine at the top, in the middle with contact cement glue. I also made a loop there before I started wrapping the twine around the heart. I glued it in some places as I wrapped, Once it was completely wrapped, I made the flowers from lace.
To make the flowers, I just glued the lace while kind of making folds until it was a circle. Once that part was done, I glued a button in the middle. I didn't like the way the flower looked like just flat with a button. So I put glue around the bottom edge of the button and pulled the lace up and held it there, like in the picture above. That just gave some dimension to the flower. Then I glued the flowers on and it's done!
Thanks for stopping by!
My inspiration came from these wire hearts I bought off Ebay years ago. I couldn't think of many things to make with them, they just sat there, bugging me, until now. With Valentines coming up, I thought it would be a good time to think of something to make.
I started the twine at the top, in the middle with contact cement glue. I also made a loop there before I started wrapping the twine around the heart. I glued it in some places as I wrapped, Once it was completely wrapped, I made the flowers from lace.
Thanks for stopping by!
Crystal
....the Lord does not see as man sees; for man looks at the outward appearance, but the Lord looks at the heart.”
1 Samuel 16:7b
This post is linked up to; The Everyday Home Happy and Blessed Home Sadie Seasongoods Pink Saturday Vintage Charm
Wednesday, January 27, 2016
A Little Craft Project
My awesome neighbour invited me to "Craft Night" at her church last Saturday. I had been to two last year and loved them. The lady in charge does such a great job and plans projects that are so amazing.
This time we made a picture holder out of a piece of wood. She had the words cut from vinyl, but you could use a stencil.
We stained the wood and put the letters on. Then we glued the paper heart with words onto a wooden heart she had for us and then glued the heart in place.
We screwed little binder clips to hold the pictures and tied jute around it. I glued this in place when I got home so it wouldn't fall off.
It turned out great.
Here are the things we made last year;
I will leave you with the quote we heard at the craft night in regards to "Every heart has a story to tell". She said she had seen it on Facebook and it gave her a lot to think about and it could give us a lot to think about too.
This time we made a picture holder out of a piece of wood. She had the words cut from vinyl, but you could use a stencil.
We stained the wood and put the letters on. Then we glued the paper heart with words onto a wooden heart she had for us and then glued the heart in place.
We screwed little binder clips to hold the pictures and tied jute around it. I glued this in place when I got home so it wouldn't fall off.
It turned out great.
Here are the things we made last year;
I will leave you with the quote we heard at the craft night in regards to "Every heart has a story to tell". She said she had seen it on Facebook and it gave her a lot to think about and it could give us a lot to think about too.
"There wouldn't be a person you didn't love if you had read their book".
Monday, March 30, 2015
Spring Makeables
I have been busy making cute things to sell at some upcoming spring markets in our area and thought I would share some with you.
I made this bird's nest using old rusty tart pans, a little store bought bird's nest, rusty wire, small tags and eggs cut off an Easter wreath from the dollar store. I glued the eggs in the nest, fashioned the wire as a hanger and stamped "spring" on the tag. I tied the tag on with some twine and glued it in place.
I get a lot of my craft supplies off Ebay from China. I bought 300 little tags for $1 and 200 little metal keys, on the "dream" bottle, for $1.25 all with free shipping. I like getting things delivered right to my home, so that I have less things to shop for when we do make it to the big city.
That is a little sample of the things I've made.
This post is linked up to: Vintage Charm The Everyday Home
| A little hanging bird's nest. |
I made this bird's nest using old rusty tart pans, a little store bought bird's nest, rusty wire, small tags and eggs cut off an Easter wreath from the dollar store. I glued the eggs in the nest, fashioned the wire as a hanger and stamped "spring" on the tag. I tied the tag on with some twine and glued it in place.
| Decorated jars |
I get a lot of my craft supplies off Ebay from China. I bought 300 little tags for $1 and 200 little metal keys, on the "dream" bottle, for $1.25 all with free shipping. I like getting things delivered right to my home, so that I have less things to shop for when we do make it to the big city.
| Framed keys on burlap background. |
| Rebekah wood burned garden markers. I hope she doesn't sell them all, because I'd like to buy some. |
That is a little sample of the things I've made.
This post is linked up to: Vintage Charm The Everyday Home
Saturday, March 14, 2015
Crocheted Headband Tutorial
I have been having lots of fun crocheting these headbands lately. Now that winter is almost over here in Central Alberta:) BUT, I'll be ready for next winter. These headbands whip up so fast! Just an hour or two. And the flowers only take a few minutes!
Before I start to TRY to tell you how to make them, please remember I'm not really a crocheter, so I might not be able to use the proper terminology. And if you know a better way, please share with me!
To start I chained 12 or 13 for adult size or 10 or 11 for child size. (Leave about 8 inches of tail yarn length for sewing it up later.) This will be your width. Then, chain 3 more. This is the first double crochet stitch. Now, starting with the next chain over, double crochet in each stitch to the end.
Chain 3 and turn your work. Starting in the next stitch, double crochet in each stitch to the end. Chain 3 and turn your work. Repeat this until it is the desired length. You want about 2 inches overlap to sew together. I think for adult, mine were about 20 inches long and child size was about 18 inches long. But if you are making it for yourself, just keep wrapping it around your head until it is the right size.
I like the way the chain 3 along the edges kind of makes a scallop edge.
When it is the right length, cut the yarn to about 10 inches and pull through the last stitch. Using the tail ends of yarn, I sew the headband together, making sure to line up the edges. There will be about 2 inch overlap here. I don't stitch right along the edge of the top overlap. I stitch about 3/4 of an inch in. I try to make both strings end up in about the same place at the back to tie them together in a knot. But don't cut them, you can still use them to sew on your flower or buttons.
Now, onto the flower. I like making a two layer flower and again, it's just using the double crochet stitch. For the smaller one, chain 7. Then slip stitch into the first chain. This makes a circle.
Now, just like the headband, chain 3. You're going to double crochet right into the circle. Double crochet 3 times, chain 3, then slip stitch into the circle again. Make sure you are working away from the yarn tail. Repeat 4 times to end up with 5 petals. Snip the yarn to about 6 inches, then pull the yarn through the last slip stitch. Tie the 2 yarn tails together. Then I sewed each tail through the back of one petal and snipped the yarn.
The large size flower is made the same way, only start with chaining 11 and making 6 or 7 petals.
I first sewed on the large flower, then the small flower, then I sewed on the button in the middle. And this is the finished product;
My personal preference is just sewing on 2 buttons like this;
These headbands are great because they don't use that much yarn. I just used some scraps I got from a lady from church.
That is how I crochet headbands.
This post is linked up to; Happy and Blessed Home Thrifty Thursday The Dedicated House
Before I start to TRY to tell you how to make them, please remember I'm not really a crocheter, so I might not be able to use the proper terminology. And if you know a better way, please share with me!
To start I chained 12 or 13 for adult size or 10 or 11 for child size. (Leave about 8 inches of tail yarn length for sewing it up later.) This will be your width. Then, chain 3 more. This is the first double crochet stitch. Now, starting with the next chain over, double crochet in each stitch to the end.
| I don't know if you can see my finger peeking threw the stitch next to the 3 chains. That's where you start the double crochet stitch. |
Chain 3 and turn your work. Starting in the next stitch, double crochet in each stitch to the end. Chain 3 and turn your work. Repeat this until it is the desired length. You want about 2 inches overlap to sew together. I think for adult, mine were about 20 inches long and child size was about 18 inches long. But if you are making it for yourself, just keep wrapping it around your head until it is the right size.
I like the way the chain 3 along the edges kind of makes a scallop edge.
When it is the right length, cut the yarn to about 10 inches and pull through the last stitch. Using the tail ends of yarn, I sew the headband together, making sure to line up the edges. There will be about 2 inch overlap here. I don't stitch right along the edge of the top overlap. I stitch about 3/4 of an inch in. I try to make both strings end up in about the same place at the back to tie them together in a knot. But don't cut them, you can still use them to sew on your flower or buttons.
Now, onto the flower. I like making a two layer flower and again, it's just using the double crochet stitch. For the smaller one, chain 7. Then slip stitch into the first chain. This makes a circle.
| This is the slip stitch. Put the hook through the stitch, yarn over with the yarn and pull through. |
Now, just like the headband, chain 3. You're going to double crochet right into the circle. Double crochet 3 times, chain 3, then slip stitch into the circle again. Make sure you are working away from the yarn tail. Repeat 4 times to end up with 5 petals. Snip the yarn to about 6 inches, then pull the yarn through the last slip stitch. Tie the 2 yarn tails together. Then I sewed each tail through the back of one petal and snipped the yarn.
The large size flower is made the same way, only start with chaining 11 and making 6 or 7 petals.
I first sewed on the large flower, then the small flower, then I sewed on the button in the middle. And this is the finished product;
My personal preference is just sewing on 2 buttons like this;
These headbands are great because they don't use that much yarn. I just used some scraps I got from a lady from church.
That is how I crochet headbands.
This post is linked up to; Happy and Blessed Home Thrifty Thursday The Dedicated House
Subscribe to:
Posts (Atom)


