Showing posts with label Tutorials. Show all posts

Thursday, April 28, 2016

Plate Stand

I just adore these plate stands and they are so easy and inexpensive to make.


I bought the big dish from Dollarama. Which you can kind of tell because they are all a little warped along the top.


I used an old glass candle holder for the base.  They worked so great for this project, because the bottom of the candle holder fit perfectly in the circle on the bottom of the plate.

This is the top of the candle holder, which will be on the bottom once it is glued on.

I painted the candle holder with chalk paint and then I spray sealed it a couple of times to protect the paint.
This is the bottom of the candle holder that is glued to the plate.  This one is painted grey.

Once the candle holder was completely dry, I sanded the paint off the edge where I would be gluing it so that it would be a true bonding. Then I glued the bottom of the candle holder to the bottom of the plate using "Goop".  I found it takes this Goop glue about 4 days to dry to the point where you can't move it around anymore.  So, if that's the kind you use, be careful not to move it too much for the first few days.

I wouldn't want to submerge this stand in water, but it is washable.

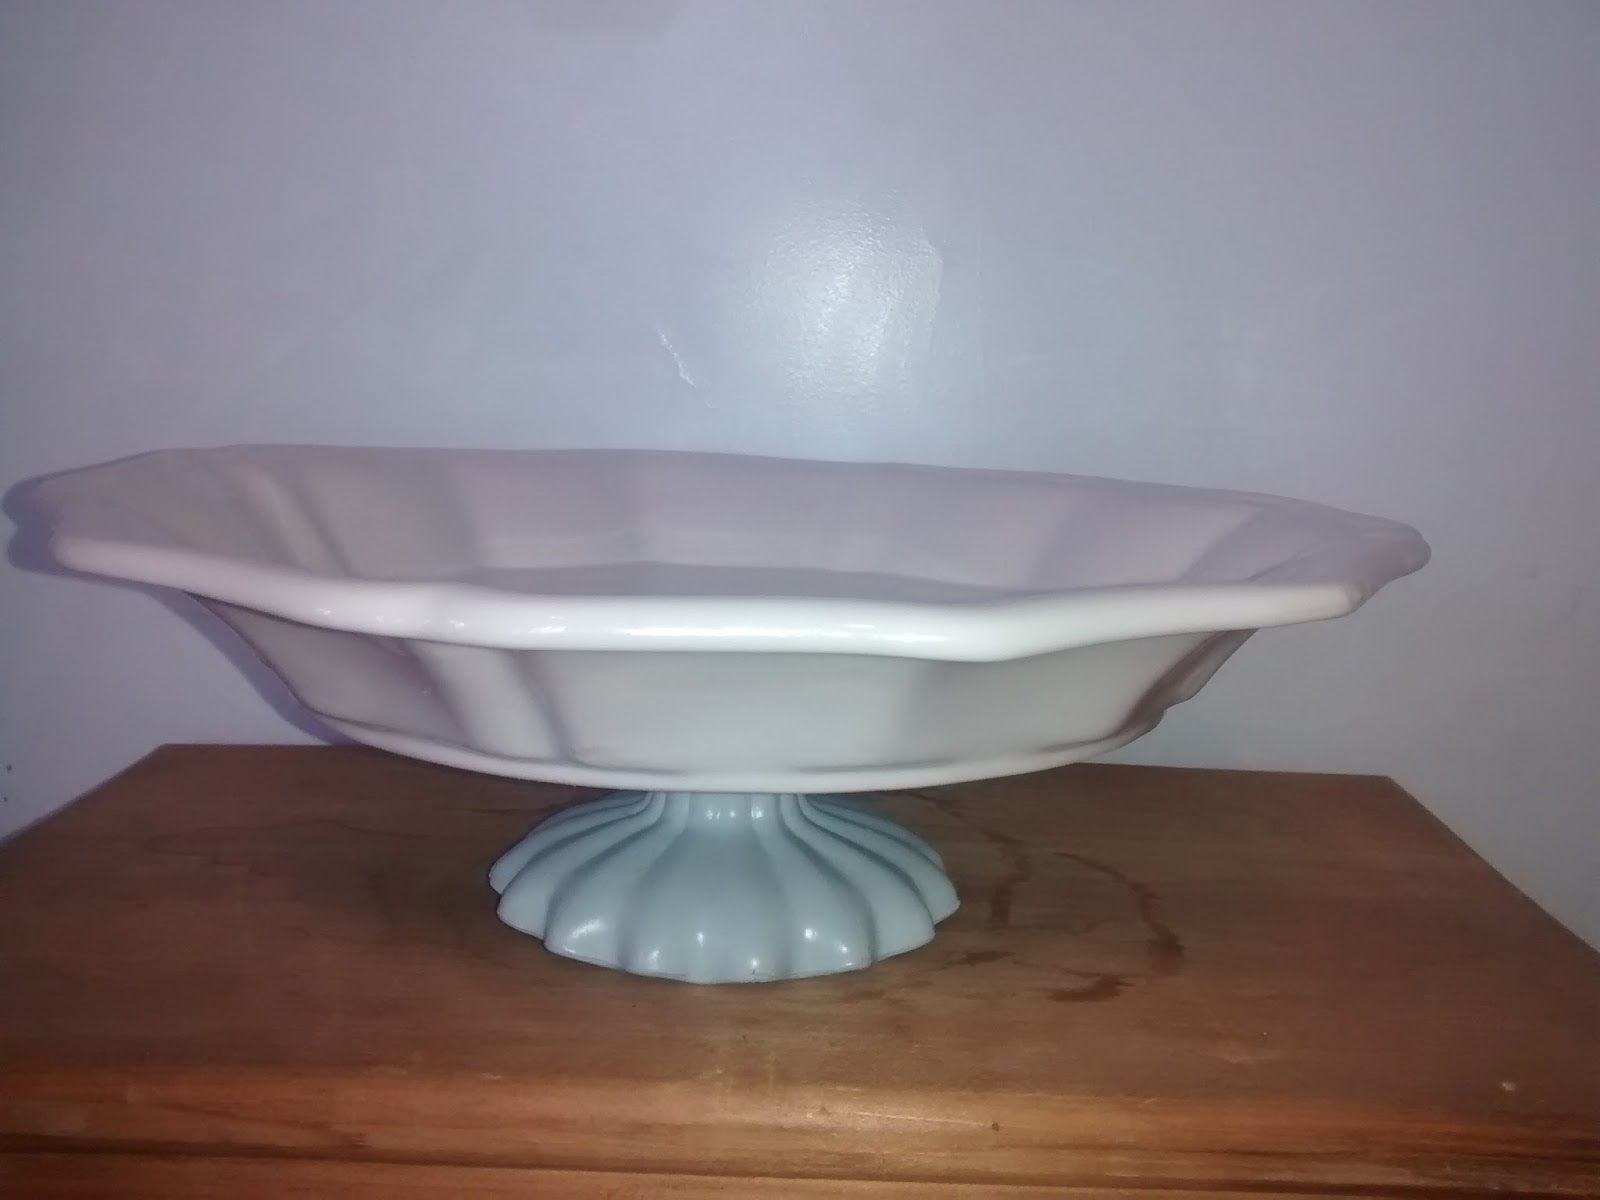
This one I'm keeping. I love the blue base.


I think they turned out pretty cute.

Thanks for stopping by.

Crystal

This post is linked up to'

Vintage Charm
Anything Blue Friday at The Dedicated House
Vintage and Thrifty Finds
Wake Up Wednesday "Linky" Party
Talk of the Town

Wednesday, February 17, 2016

Thriftiness - Canned Almonds

I don't know about where you all live, but around here almonds are mucho dinero.  I think it's around $18/kg at Costco.


When these almonds in the shell came on sale for $0.99/lb at Christmas I couldn't pass it up.


I bought 11 lbs of almonds and 2 lbs of hazelnuts.  I had the idea that I would oven can them after I shelled them.   It took me over a week to shell them all and because it took so long, we nibbled on them quite a bit.

I calculated the cost on the shelled nuts and found them to cost $5.50/kg.  That's 1/3 the cost of Costco.

Then I oven canned them in pints using the oven canning I posted in this post.  It is a method of canning dry items in jars and they are supposed to stay fresh for years.


I have already been snacking on a jar and they are SO good.  They are very crisp and tasty.

Thanks for stopping by.

Crystal


This post is linked up to:  Home To 4 Kiddos

Wednesday, October 7, 2015

DIY Burlap Bunting


There is something about burlap that seems so right. Especially during Fall.  I made some Fall burlap banners to sell at the market and wanted to share with you my process.

I just bought 2 small packages of burlap from the dollar store. Each $1.25 package made 2 banners. I also liked that this particular burlap is kind of stiff. So it works well for this project.

I used my straight edge and rotary cutter to cut the triangles.  I figured out from the angled lines and measurements on my straight edge how to get the size of triangle that I wanted.  It would be too hard for me to explain though. So just fool around until you think you have it.

Before I cut the triangles, I cut the burlap into strips. Then I cut the triangles from the strips.

Once I had the triangles cut, I painted the edges very thinly with glue to help them not to unravel.


For the letter stencils, I used Word and found a font I liked.  I made it bold and put the size at about 180. Then I printed it on card stock and then cut the letters out.  Using an exacto blade would have probably been easier, but I couldn't find mine. So, I poked a whole through the letter using a steak knife, then I got my scissors in that and cut out the letter.


I also printed a picture that would go in between the words. For the "Happy Fall" banner, I used a crow and for the "Give Thanks" banner, I used a maple leaf.

To stencil, I used those foamy paint brushes, because my hubby just bought a big bag of them, so I thought I'd try it. They worked really well.


For the letters like "p" and "a", remember to tape the center piece in place on the burlap, so that it has the whole where it should be.


Once all the triangles were stenciled, I glued them on a strand of twine using contact cement for glue.


I was using the paint bottles to hold the twine straight while the glue was drying. It wants to curl up.  I glued the triangles right on top of the twine and spaced them apart a bit.  I also left about 10 inches on either end and tied a loop on each end for hanging.


I just love how they turned out!

This post is linked up to;  Happy and Blessed Home


Saturday, September 5, 2015

Making Chalkboards

I have a new obsession.  I have been making chalkboards.


I keep my eyes open at the thrift store or garage sales for cheap picture frames.  Like these;


I bought these at a garage sale for $0.25 each.  Then I take them apart and clean them up a bit.  Next I spray paint the frame itself.  For these I chose white and light blue.

Then I make the chalkboard by spray painting the glass that comes with the frame.  I use spray-on black chalkboard spray.


You can see my spray paint area.  I use an old oven rack over newspaper.  It will take 2 or 3 coats to get the right coverage on the chalkboard.  Then I just put it all back together and have a great chalkboard.


The can of chalkboard spray paint only costs $7.00 and I have made 6 chalkboards so far, with lots left in the can.

I'm trying to find other items to experiment on. Such as an old wooden cutting board. I'll just have to keep my eyes open.


This post is linked up to;  The Dedicated House  I Gotta Create  Blooming Homestead  The Idea Room  I Should Be Mopping the Floor  Making it in the Mountains


Wednesday, October 29, 2014

Christmas Crafts - A Sneak Peak

Well, my Christmas Craft Show is this Saturday and I'm basically ready. Yay!!!!! I have packed up most of what I have made, so I will take pictures at the craft show, but I have a few things to show you a sneak peak.

I found both of these ideas on Pinterest.


"Joy" signs made from weathered wood found on our property. I printed out the letters on copy paper, then cut them out and traced them on the wood.  Then I painted in the letters and I sanded down the white letters to make them more distressed.  I tied a strip of burlap around them and I found the bell with the pinecones and greenery at Dollar Tree.  I nailed on a metal picture hanger on the back. (Actually, I did that before I attached the bell, so it wasn't in the way.) Done!

The tag says, "Monday the washing..."


Friday, October 10, 2014

Make Your Own Fall Fixin's

It's my busy crafting time of year again. Well, actually, it's only busy because I am a huge procrastinator.  I was at a Farmers' Market today and wanted to bring some fall themed crafts.  Last year for a Christmas Craft Show I made Winter Fixin's, which you can see here.  I thought it would be cute to make some Fall Fixin's.  Really, that is just a new name for potpourri with neat things in it.
 
So, I went out and picked rose hips off the wild rose bushes that grow here.  Usually I pull the long poky things off before I dry them. Then I bake them at low (170 deg) temperature for 1 - 2 hours.  I learned that this is necessary, rather than letting them dry naturally.  I let them just dry on their own a couple of years ago and made potpourri and put it in bags.  When I went to use it, there were these little grubby type worms in the bag with the rose hips! Ew! I found that drying them in the oven kills these worms. You can see a bunch in the picture below.
 

I wanted to put little crows and pumpkins in these Fixins, so I pulled out a package of modeling clay I bought at the dollar store last year and made a bunch of each.  This one package made enough crows and pumpkins to make 8 packages of Fixin's.  That is 2 crows and 3 pumpkins in each package.  To make the indentations on the pumpkins, I used scissors and just started at the top, pushing the scissors in the pumpkin and curving the scissors to indent all the way to the bottom and did this equally spaced around the pumpkin.  I made the stem and then poked a hole in the pumpkin to stick it into.  I let these air dry for 2 days and noticed they weren't completely dry yet, so I baked them on low temperature for about 1 hour.  I  painted the crows all black with a little grey dot on each side for eyes.  I painted the pumpkins with "Americana" Honey Brown paint.  I painted the stem with "Ceramcoat" English Yew Green.  Then I mixed "Americana" Dark Chocolate  paint with 2 parts water to make a wash and covered the entire pumpkin with it to grubby them up a bit.  When all the clay figures were dry, I sprayed them with gloss clear acrylic spray paint.

 
I  added some star anise, cinnamon sticks, cloves and pine cones to it and this is what I ended up with;


I Love it!!

 
And here is the packaging I made to sell it in.  I found the crow clip art on our Microsoft Word Starter Edition clip art.  I used 6.5"x6" zippered sandwich bags (which I found at the dollar store in boxes of 50) for the bags.  I made sure to poke a hole through the bag where you can't see it to keep some air flow, just in case the clay isn't completely dry all the way through.
 
 
Here is a (blurry) close-up.
 
 
These turned out exactly as I had envisioned in my mind and I couldn't be any happier with the outcome.


Friday, November 15, 2013

Cheap Artificial Tree Makeover

Last year I scored TONS of great deals after Christmas and these 3 trees were among them. I only paid a couple of dollars each, but I really didn't like them as they were. So, after spraying them with fake snow (that I had bought about 20 years ago and knew it was finally time to use it) and adding a bit of burlap they look........

FABULOUS!


So much better than before, don't you think?

Before
After

God bless!
 

Saturday, November 2, 2013

Christmas Craft Show A Success (and a Bunch of Tutorials!)

This Christmas Craft Show is finally behind me!  I can't believe how I left making everything to the last minute, but I was able to fill my booth.  Here are some pictures;

Snowman Head Ornies, hand stitched and sewed.

Button Garland. These were a great seller. I used light weight wire and strung on two white, then one coloured button.  I didn't have as many coloured buttons on hand, so using more white stretched them out more:)

Large Homespun Candy Canes and a cabinet with chicken wire in the door.  I  had bought this cabinet from a garage sale and it had ugly fabric in the door. So I took it out and replaced it with 1/2" hole chicken wire. It sold fairly quickly, which I'm glad about, because I still have tiny scratches all over my hand from working with the chicken  wire!

Skate Wreath. Everyone loved this, but it didn't sell.

Winter Fixins.  To make these, I used little gingerbread men ornies. You can find the tutorial here. Then I added star anise, some pine cones, cloves, cinnamon sticks and rose hips.  I live in Alberta, which is known as "Wild Rose Country".  We have wild roses growing EVERYWHERE! So, the boys and I went out and picked some rose hips.  I cut the poky things growing out the bottom, put them on a cookie sheet, sprinkled scented oil on them and baked them at 170 deg for about 2 hours, stirring every so often. Then I left them out for 3 days to finish drying.

Homespun Candy Canes.  I got this idea from Eyeballs by Day, Crafts by Night and it can found here.  These were a big seller.

I made this star out of vintage wooden rulers, then added a pip berry wreath.  I also got this idea from Eyeballs by Day, Crafts by Night.  It sold right away! I wish I could find more old rulers, but to be honest these are the only 5 I found in a couple of months looking.

Rebekah made these Gifts in a Jar.  We didn't sell any:(  But she is going to use some for here music teachers and we might hit another market in a couple of weeks.

Finally, a Star Tree Topper.  I made these by spray painting an old bobbin brown, then I glued on a metal barn star.  I also nailed it on with a very small nail through a hole that was in the barn star.

Here is the back view of the tree topper.

There you have it! All the rest of my tutorials in a nutshell.  I hope you all enjoyed it!
God bless.

This post is linked up to; WhipperBerry Funky Junk Interiors Be Different Act Normal Nifty Thrifty Things The Dedicated House Raising Arrows

Tuesday, October 29, 2013

Rustic Cinnamon Stars

Well, I'm ready for another tutorial. You can find my first tutorial for Cinnamon Gingerbread Ornies here and my second one for Prim Hanging Tea Lights with grungy battery operated lights here.
So, I'm from Canada, eh. You know, The Great White North and all that stuff.  Lots of people like rustic things to put in their log houses and cabins up here.  I don't have a log house or cabin (wish I did), but I like these rustic cinnamon stick stars anyway.

 
It all has to do with the layering of the cinnamon sticks. Now, by all means, you can do this with plain sticks. I think that looks awesome too. But while we were visiting where we used to live in British Columbia, I bought a big bag of cinnamon sticks cheap from the ethnic section in the grocery store.  Did you know that spices are almost always cheaper in the ethnic section? And they have spices that you can't usually find in the regular section.
 
This is the first step.  Put 2 sticks together like this;
 
 
Then, place another stick under on the bottom and on top at the top;
 
 
Place another stick starting at the other bottom corner and crossing over;
 
 
Finally, place the last stick across;
 
 
After I have them the way I want them, I glue it all together with a glue gun. Then I tied twine around each connection.  I used homespun or twine for the hanger.  I also bundled a piece of artificial greenery with some berries and tied it with homespun. Then I glued that on the front of the star.
 
 
I'm happy with the way they turned out. 
God bless!

This post is linked up to; The Dedicated House Love Grows Wild
 Happy and Blessed Home
 Saving 4 Six Next Gen Homeschool Alderberry Hill The Blackberry Vine